
Crochet for beginners - learn the basics and make your first toy
Crocheting is a traditional technique done by hand, which we can use to create clothing, practical accessories or decorations, and even toys, out of yarn. Its name comes from the French word crochet, which means "hook". While this term is also used in English, Italian or Spanish, in German crochet is called Häkeln, in Dutch it is haken, in Danish haekling, in Norwegian hekling, in Swedish virkning, in Polish szydełkowanie, and in Hungarian horgolás.
Unfortunately, very few records of the complete origins of crochet have survived, but it is thought that the technique originated in Arab countries, South America or China, and only later spread throughout Europe over time. At first crocheting was done using the fingers, later with simple tools made of different materials, and gradually special hooks began to be produced.
The first printed manuals appeared in the Netherlands in the 19th century and contributed to the spread of this technique to a wider segment of the population, especially housewives. In this period, mainly lace was crocheted, which gradually replaced the more expensive and time-consuming bobbin lace patterns and became a common part of home textiles and fashionable clothing.
Fancy giving it a try? Let's see together how to get started.
What you will need
Prepare your hook and yarn to start with, but don't forget your needle, scissors, row markers and a tape measure.
Choice of hook
Adapt your hook size to the yarn thickness - thinner yarn requires a smaller hook. Try different materials and choose the one that suits you best. For beginners, plastic, aluminum or ergonomic hooks are suitable.
Hook types by material
• Plastic: suitable for complete beginners, light and more pliable, they tend to break more easily.
• Aluminum and metal: strong, they don't break, good to hold and slide on the yarn.
• Wooden: smooth and lightweight, yarn does not slip on them, suitable for longer-term projects (blankets or scarves).
Wool and yarn
Medium weight yarns (e.g. size 4) are suitable to start with, ideally smooth so that the stitches are visible. Loop yarns, long pile yarns or chenille yarns are unsuitable for beginners, as the posts are harder to distinguish.
Basic abbreviations
Starting to crochet
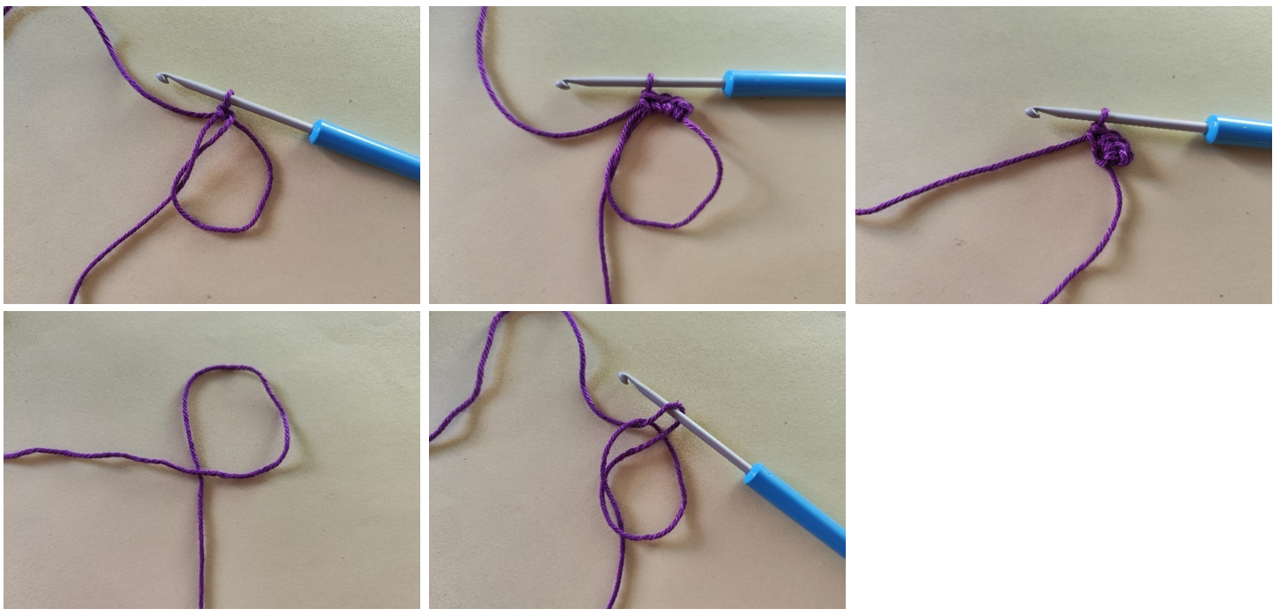
Slip knot
Make a stitch (loop) at the end of the yarn, using your fingers or a hook, pull the yarn through the stitch away from the skein and insert the hook. Gently pull the end of the yarn and make a knot under the hook.
Yarn up
Grasping the hook in one hand, with the yarn unwound from the skein in the other hand, wrap it around your index finger. Insert the hook under the yarn pointing away from your finger.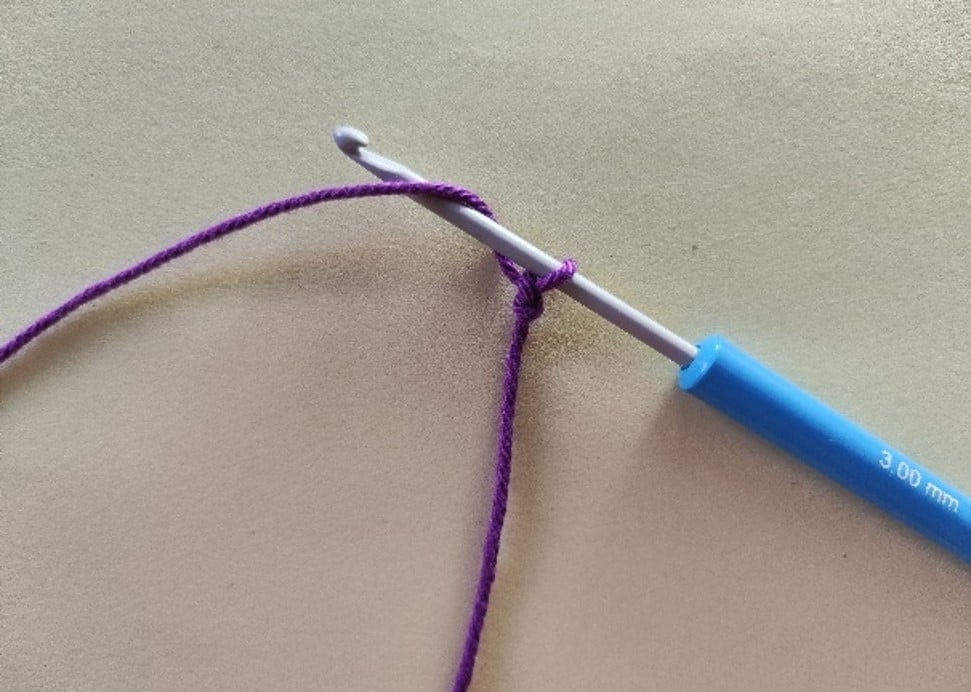
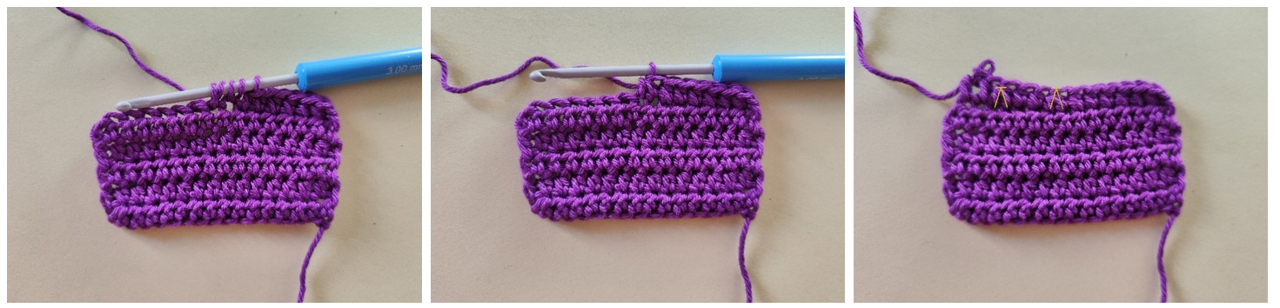
Chain stitch (ch)
The chain stitch (or just chain) forms the basis of every crochet project. Start by making an initial chain of individual chain stitches.
Yarn over and pull it through the loop on the hook. Repeat to create a chain, which is later crocheted into different posts.
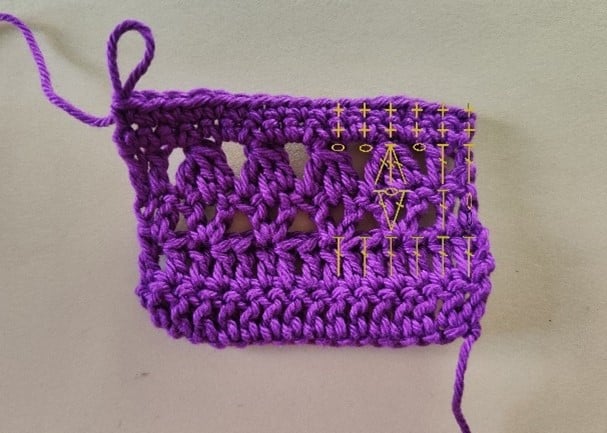
Basic posts
Single crochet (sc)
Insert the hook into the stitch, yarn over pointing away from your finger and pull out of the stitch – you now have two loops on the hook. Yarn over again and pull it through the two loops on the hook.

Half double crochet (hdc)
Yarn over, insert the hook into the stitch, yarn over pointing away from your finger, pull the yarn out of the stitch - on the hook you have three loops. Yarn over again and pull it through all three loops on the hook.
Double crochet (dc)
Yarn over, insert the hook into the stitch, yarn over pointing away from your finger, pull the yarn out of the stitch - on the hook you have three loops. Yarn over and pull it through the first two loops on the hook, yarn over again and pull it through the last two loops on the hook.
Treble crochet (tr)
Yarn over twice, meaning wrap the hook around the yarn twice, insert the hook in the stitch, yarn over pointing away from your finger, pull the yarn out of the stitch, on the hook you have four loops. Yarn over and pull it through the first two loops on the hook, yarn over again and pull it through the next two loops, yarn over one last time and pull it through the last two loops on the hook.
Slip stitch (ss)
Make a simple slip stitch to finish the project, to complete a row or even while crocheting.
Insert the hook into the stitch, yarn over pointing away from your finger and pull the yarn through the loop on the hook.

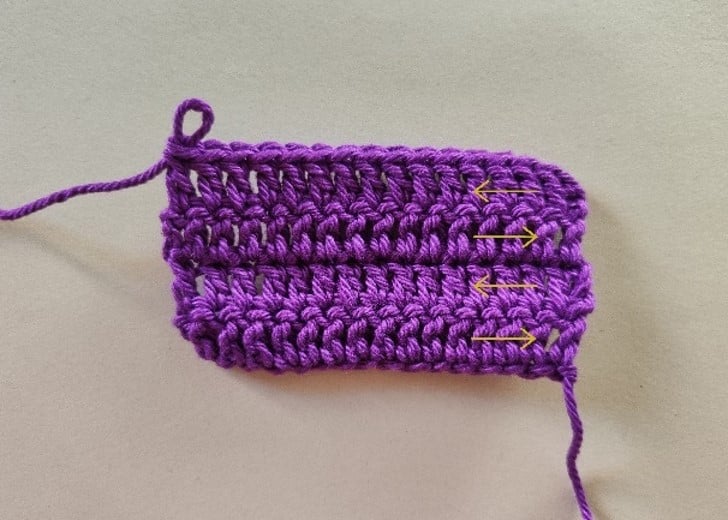
Standard crochet
In individual rows, crochet as usual into the stitch - under both loops of the stitch of the previous row.

Front loop (flo)
Crochet only behind the front half of the stitch - insert the hook under the front loop of the stitch of the previous row.

Back loop (blo)
Crochet only behind the back half of the stitch - insert the hook under the back loop of the stitch of the previous row.

Front post stitch (FPsc, FPhdc, FPdc...)
Crochet from the front around the very post of the previous row - insert the hook around the post of the previous row from the front and crochet the desired post.

Back post stitch (BPsc, BPhdc, BPdc...)
Crochet from behind around the very post of the previous row - insert the hook around the post of the previous row from behind and crochet the desired post.

Shaping:
Increase (2 into one stitch = V, Vsc, Vhdc, Vdc...); (3 into one stitch = W, Wsc, Whdc, Wdc...)
Shaping is actually splitting or unhooking the stitches by crocheting multiple posts into one stitch.

Decrease (2 stitches = A, sc2tog, hdc2tog, dc2tog...); (3 stitches = M, Msc, Mhdc, Mdc...)
Decreasing is the crocheting of two or more posts together.
For a single crochet, insert the hook in the stich, yarn over, pull the yarn out of the stitch, do not finish the post, insert the hook in the next stitch, yarn over, pull the yarn out of the stitch, you have three loops on the hook, yarn over and pull it through all three loops on the hook.

For a half double crochet, yarn over, insert the hook in the stitch, yarn over, pull the yarn out of the stitch, do not finish the post, yarn over, insert the hook in the next stitch, yarn over, pull the yarn out of the stitch, on the hook you have five loops, yarn over and pull it through all five loops on the hook.
For a double crochet, yarn over, insert the hook in the stitch, yarn over, pull the yarn out of the stitch, yarn over, pull the yarn through the first two loops on the hook and do not finish the post, yarn over, insert the hook into the next stitch, yarn over, pull the yarn out of the stitch, yarn over, pull it through the first two loops on the hook, on the hook you have three loops, yarn over and pull it through all three loops on the hook.

Specially for toys:
Invisible decrease (A)
Decrease the single crochets invisibly behind the front loops.
Insert the hook into the front stitch of the post, insert the hook in the front stitch of the next post, yarn over, pull it through both front loops and complete the single crochet by yarning over and pulling it through both stitches on the hook.
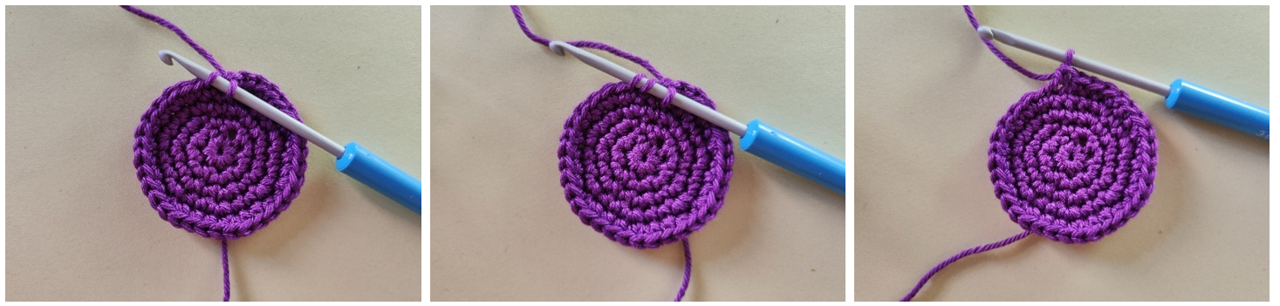
Magic ring (MR)
Use this at when starting to crochet individual parts of toys.
As with the initial loop, create a stitch through which you pull the yarn from the skein using your fingers. The trick is that the end of the yarn has to be at the bottom of the stitch, you don't pull the stitch, i.e. the ring, right away, you crochet the posts through the loop and the end yarn at the same time. When the required number of stitches have been worked, gently pull the end of the yarn to close the ring.
Make a stitch at the end of the yarn, pull the yarn through this stitch with your fingers away from the skein and insert the hook into it, hold the stitch with your fingers and crochet one chain stitch. Then crochet the required number and type of posts. After working them, gently pull the end of the yarn towards the back.
Crocheting rows:
Straight rows
Work one or more chain stitches at the beginning of the row according to the type of posts in the row. Turn the work at the end of the row.
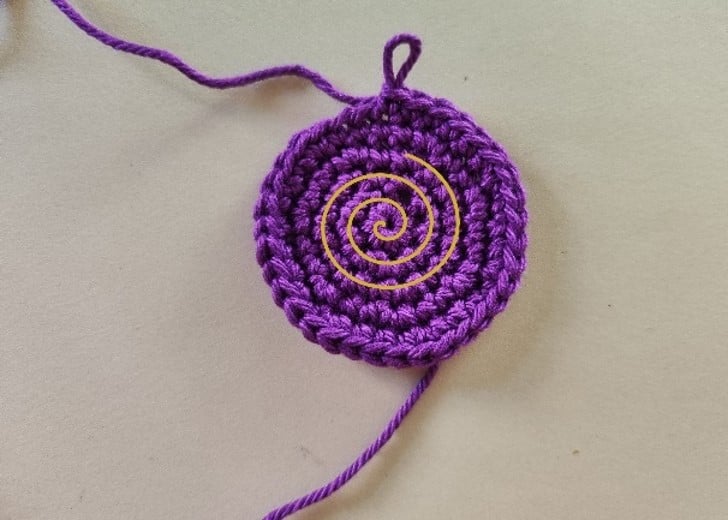
Circular rows
Work one or more chain stitches at the beginning of the row according to the type of posts in the row. At the end of the row, crochet a slip stitch to join the row.
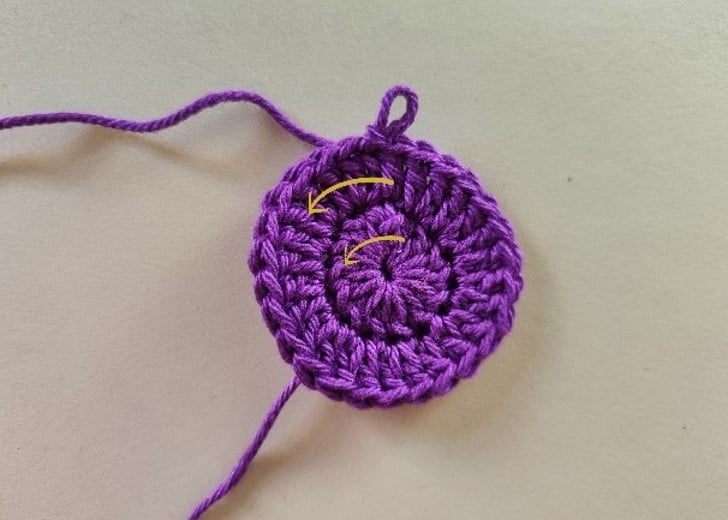
Crocheting in a spiral
Known as the amigurumi technique, it is used to crochet toys in single crochets in a spiral with slip stitches without joining the rows (rounds). Then you need to mark the first or last stitch in the row.
In conclusion:
Pattern
By combining the above posts and crochet methods, alternating posts and methods, you will achieve different kinds of patterns.
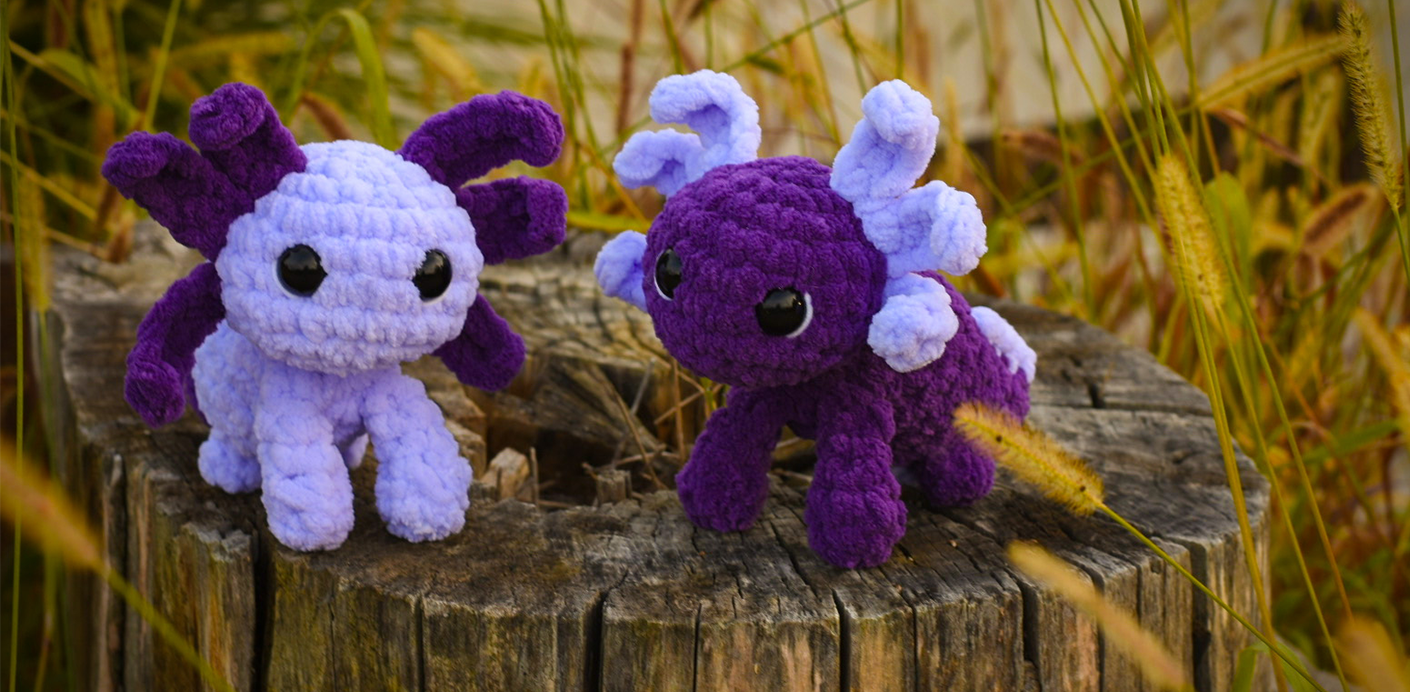
Make a nice toy
Practical instructions for crocheting axolotl
Once you've mastered the basics of crochet, you can try a project that combines all the techniques you've learned – the axolotl toy. Here are the materials and step-by-step procedure:Materials and aids
Yarn: Alize Velluto (2 shades), white yarn Yearn Art Jeans MaxiHook: 6 mm
Accessories: safety eyes 16–18 mm, filler, needle, scissors, pins, marker
MR – magic ring
ch – chain
ss – slip stitch
sc – single crochet
V – unhook ( 2 posts in 1 stitch)
A– crochet 2 stitches
dc – double crochet
hdc – half double crochet
(sc, V) x 6 = repeat what is in brackets 6 times
Fasten off – thread yarn through the needle, pass through the front loops of the last row and tighten, hide the wool in the filler.
Head
R1: 6 sc to MR (6)
R2: V × 6 (12)
R3: (1 sc, V) × 6 (18)
R4: (2 sc, V) × 6 (24)
R5 – R7: 24 sc (3 rows)
R8: (2 sc, A) × 6 (18)
R9: (1 sc, A) × 6 (12)
R10: A × 6 (6)
Tip: Place the eyes between rows 5–6. Fill and close the hole. Stitch around the eyes with white yarn.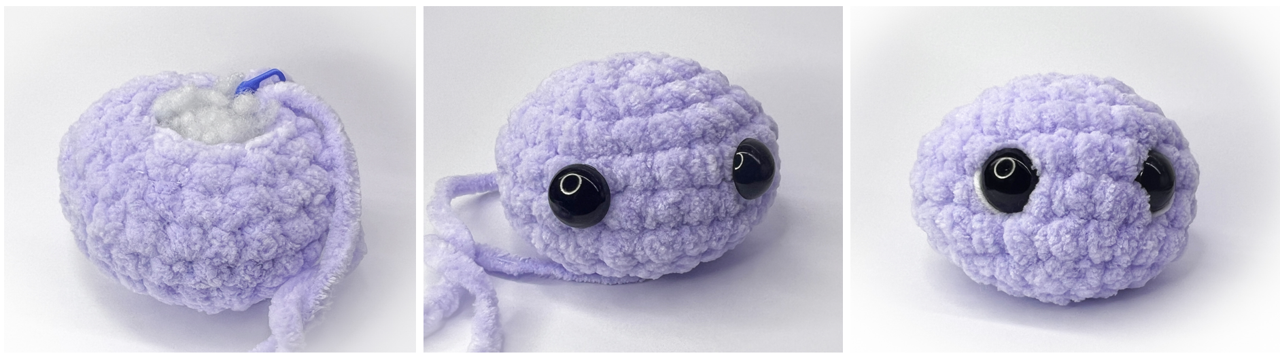
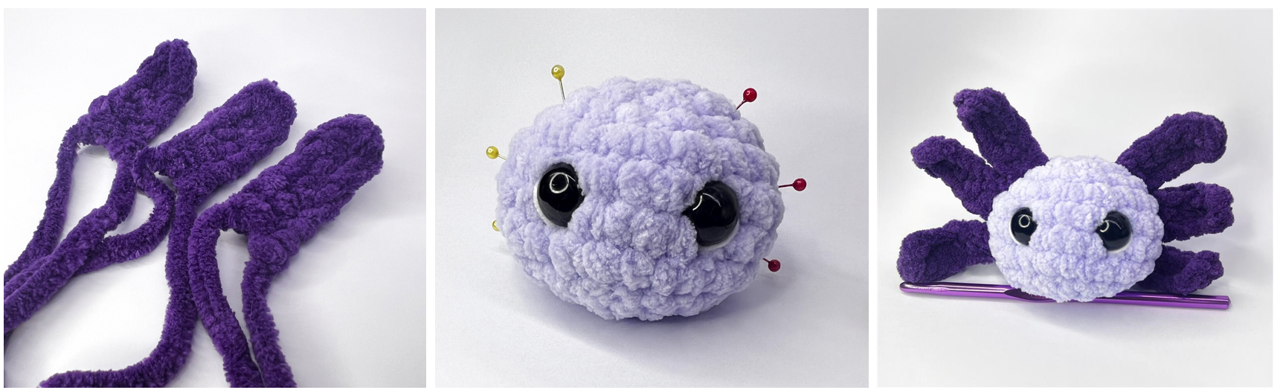
Antennae
6 ch, turn.
From 2nd ch from hook crochet 5 hdc, finish with ss.
Leave the longer ends for attaching to the head.
Repeat 6 times to get 6 antennae.
Mark a place on the head with pins, thread the needle through one chain stitch and tie off, hide the ends in the filler.
Body
R1: 6 sc to MR (6)
R2: V × 6 (12)
R3: (1 sc, V) × 6 (18)
R4 - R8: 18 sc (5 rows)
R9: (1 sc, A) × 6 (12)
R10 - R11: 12 sc (2 rows), filler
R12: A × 6 (6)
Joining: Crochet towards you 3 sc, turn, crochet 2 sc, ss and fasten off. Sew the body to the head.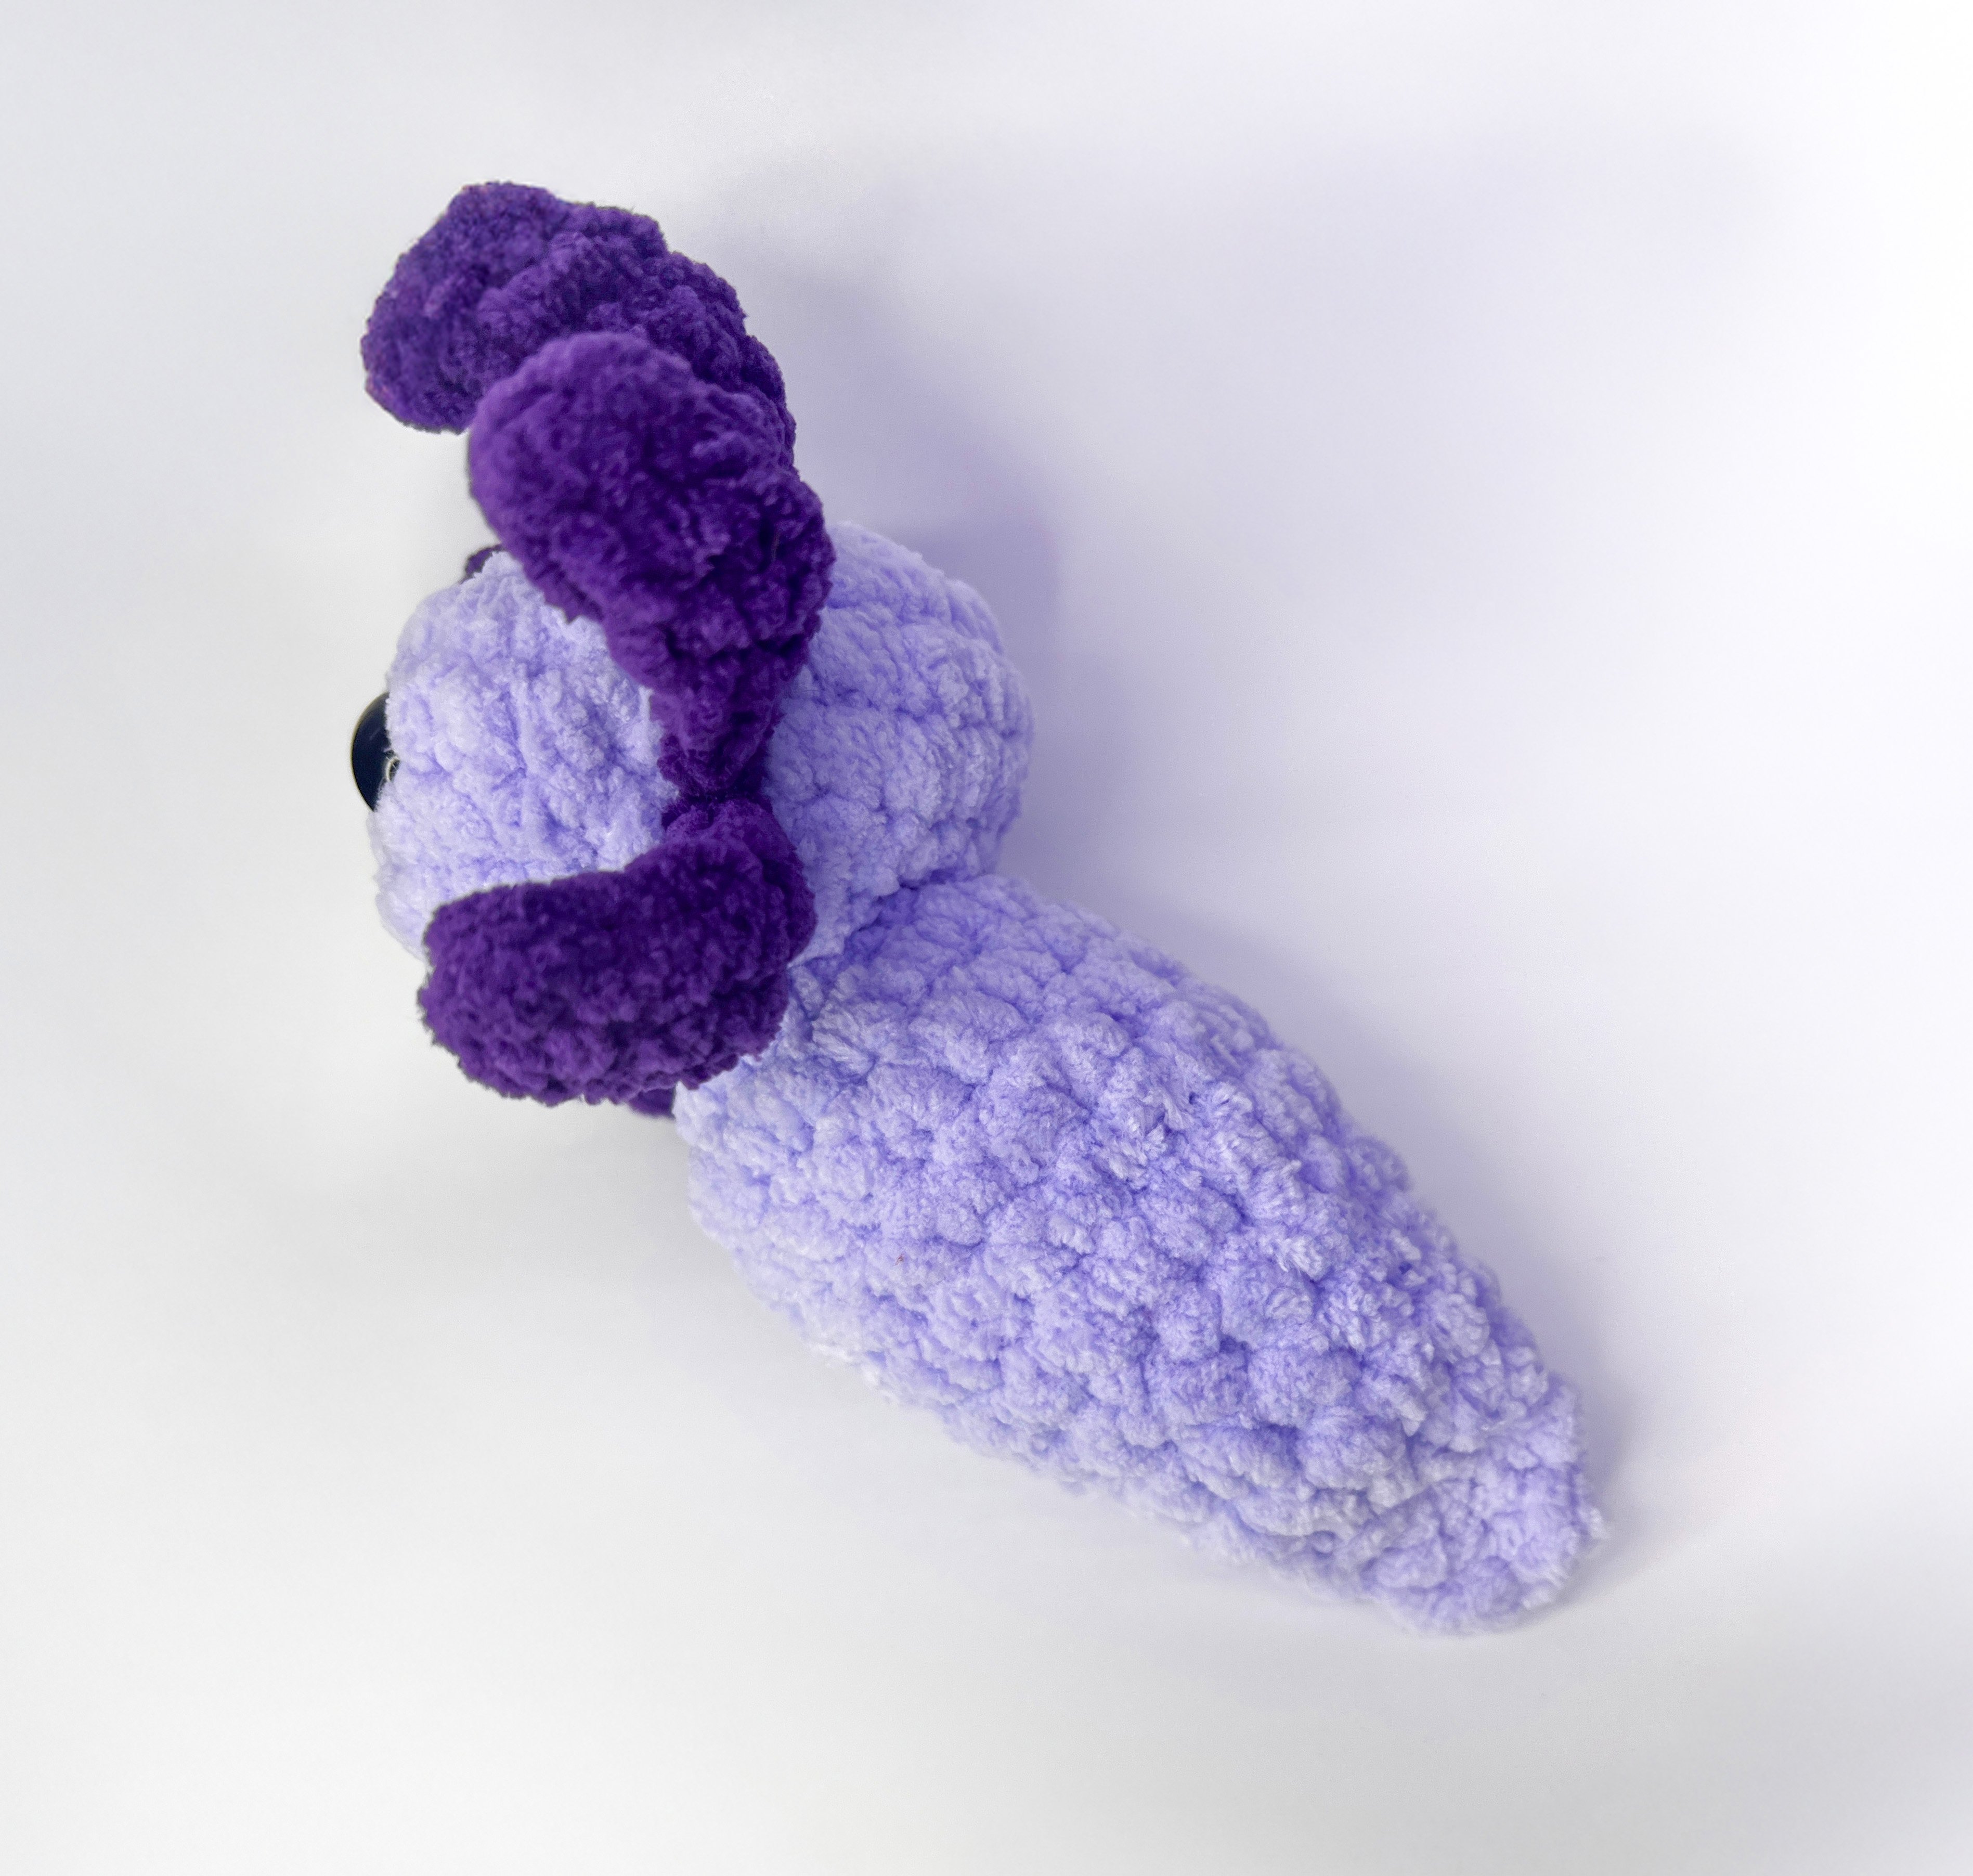
Tail
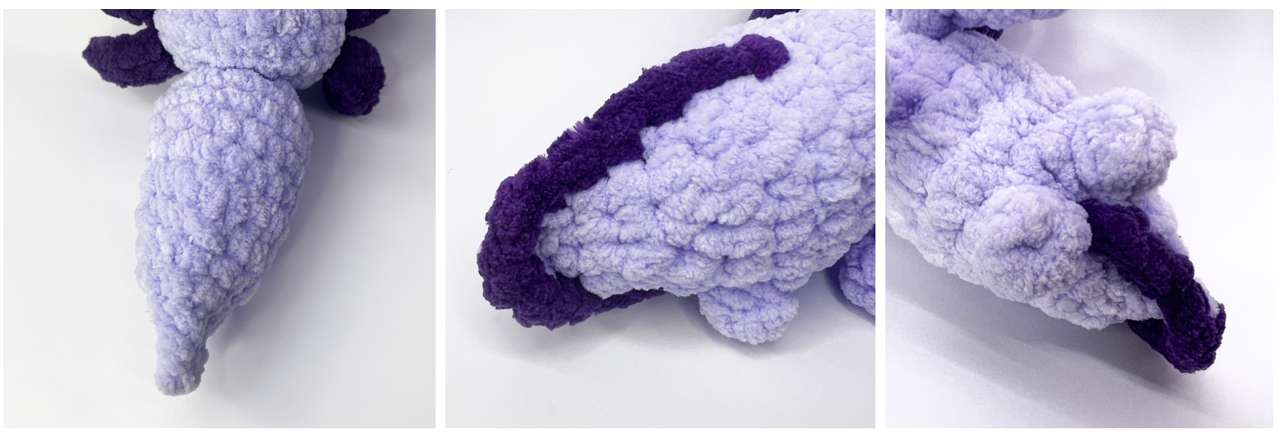
Front legs
R1: 6 sc to MR (6)
R2: 6 sc (6)
R3: (1 sc, A) × 2 (4)
R4: 4 sc (2 rows)
Joining: Crochet 2 sc together, ss and finish. Mark with pins the place to sew to the body.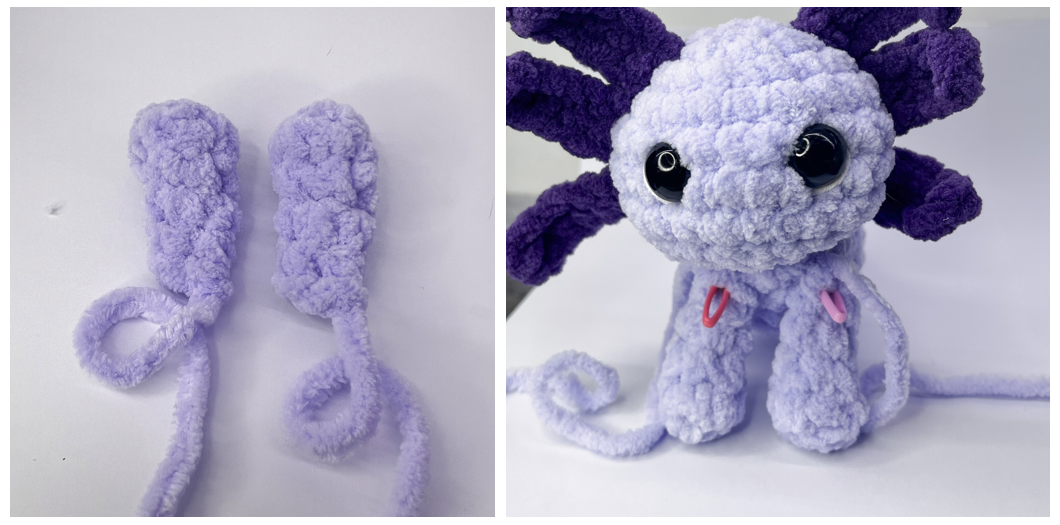
Rear legs
6 sc to MR (6), finish with ss.
Thread yarn on the needle, pass through the front loops of the last row, tighten slightly and sew to body.
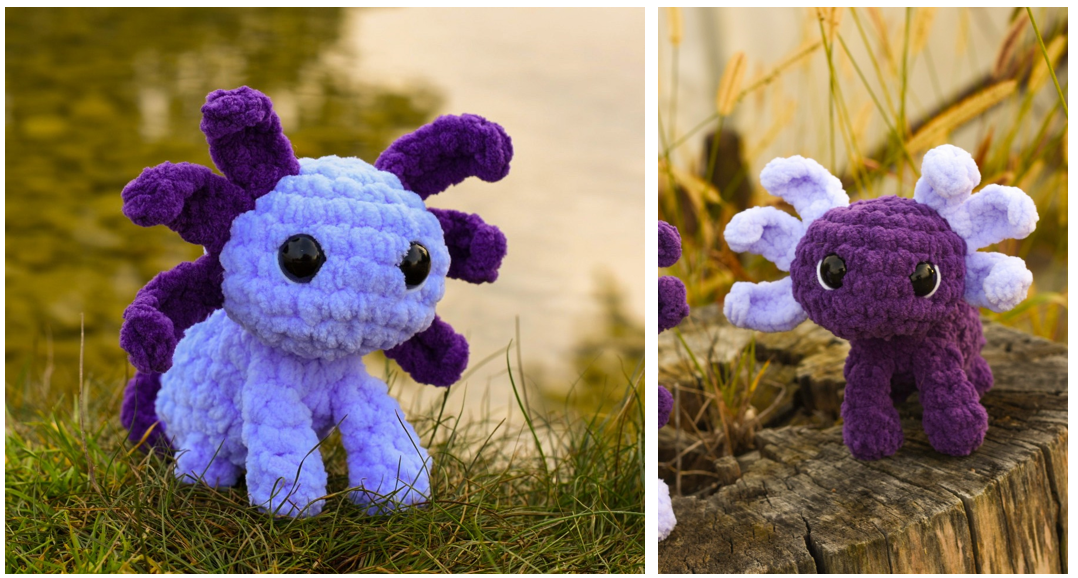
Crochet is not just some technique; it's a way of turning yarn into art. Every project, whether it's a warm scarf, a cute toy or a home decoration, starts with the first stitch – and it opens up a whole world of creativity.
And one last tip – put on your favorite music to crochet to and tune in to the rhythm, let every stitch bring you joy. Crocheting and good music together create the perfect relaxation and inspiration!
Instructions and photos: Katarína Boroš